


 Title Index
 Recently Changed
 Page Hierarchy
 Incomplete
 Tags
Tags


Overview
All Kappris print modes are available to Microsoft Word. Only print modes marked with the selector "outlook" are available to Microsoft Outlook. Print modes available to other applications are determined by using Application Integration and user-defined selectors.
Microsoft Word
Kappris was originally designed for printing with Microsoft Word. It is within this application that the most varied list of print modes needs to be available. All print modes are automatically available to Word but, since Kappris v1.7.11.5835, a print mode can be hidden from Microsoft Word by including "!Word" in the print mode's Selector property. In previous versions there is no way of preventing Word from showing them all.
Microsoft Outlook
Kappris integration with Microsoft Outlook automatically uses a selector "outlook". If you require a print mode to be available to Outlook, make sure that the print mode includes the selector "outlook" in its list of selectors.
This is done by:
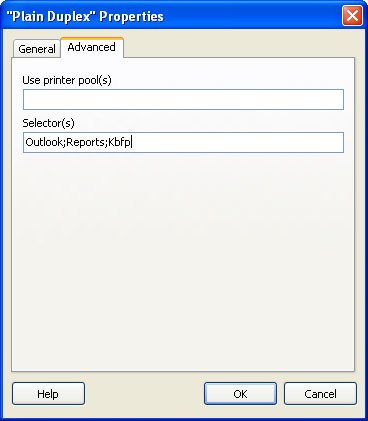
- highlighting the print mode you require (Plain Duplex in this case) and clicking "Properties";
- On the Advanced tab of the property dialog there is a field called "Selector(s)";
- make sure that the word "outlook" (neither order nor case matter) is in this field;
- NB if there is more than one selector they need to be separated by semicolons (";")
If the Outlook Kappris integration can 'see' that "outlook" is a selector for a print mode then that print mode will be available for Kappris printing in Outlook.
Other Applications
For all other applications you may define your own selectors and application behaviour.
For example:
Assume our users want Adobe Reader and Notepad to make available only Plain Simplex, Plain Duplex and Colour print modes.
Firstly we need to make the required print modes selectable as a group by applying a common selector to all of them.
- Think of a name for the selector we will use for these print modes. Let's call it "restricted", although you can call it anything.
- Highlight the print mode "Plain Simplex" and display its properties
- On the Advanced tab, make sure the "Selector(s)" field contains the word "restricted". Don't forget to separate with semicolon (";") if there is more than one selector
- Repeat with print modes "Plain Duplex" and "Colour"
- You now, effectively, have a group of print modes that all can be picked up by an application requesting the selector "restricted"
Then we need to create Application Integration entries that will use the new selector.
- Highlight Application Integration and create a new one for Adobe Reader. Let's name it "PDF", although you can call it anything.
-
Change its properties in accordance with the image below
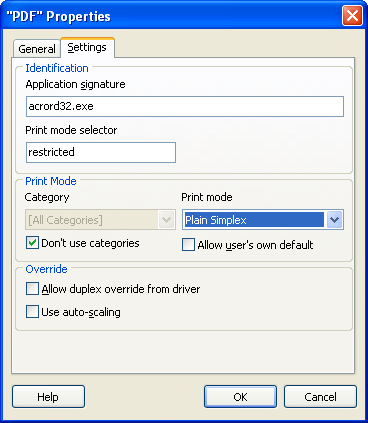
- "Application signature" is the means by which Kappris can identify which application is actually printing. On 32-bit Windows, Adobe Reader can be seen to be "acrord32.exe". In this way Kappris can work out that it needs the Application Integration called PDF to deal with Adobe Reader.
- "Print mode selector" tells Kappris which selector to use to find suitable print modes when the Application Integration is in operation.
- "Print Mode" is a way of choosing the default print mode to use for this application
- The other options are not appropriate to this subject and should be left as they are
-
The application integration used for Notepad will be similar and may look like this. Remember that the name "Notepad" is not significant. It is the application signature that really matters.
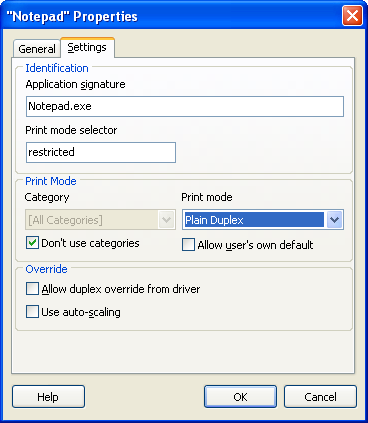
- "Application signature" is set to Notepad.exe so Kappris can associate this application integration ("Notepad") with the Windows executable "notepad.exe"
- "Print mode selector" is set to "restricted" so this application integration will use the same group of print modes as the PDF application integration
- Note that we can set a different default print mode for Notepad from the one we set for PDF.
Print Sequencer
The Print Sequencer front end can be controlled by creating an AppIntegration with a name of your choice ("Print Sequencer" is a good one). The "Application signature" field must be set to "KapprisBulkFilePrint". The Print Sequencer will then offer the print modes and the default print mode that you set for your new AppIntegration.